
Buy from 20$ on Aliexpress Gearbest
We continue to study the variety of devices of Xiaomi ecosystem for the smart home, and today we will talk about a rather remarkable device – a two-channel power control relay. First of all, the model is notable because it has the ability to integrate together with a conventional classic switch, making it possible not to give up the usual, independent control method and at the same time get all the advantages of a smart home.
Packaging
Everything is traditional for Chinese versions of ZigBee devices. Minimalistic white box with a schematic image of the sensor and the inscription in Chinese. The Aqara logo and a list of basic technical characteristics are on the back of the box. We shall consider them more in detail.


Specifications
Connection Interface – ZigBee
Maximum load power – 2500 W, but not more than 10 A
Size – 49.3 * 46 * 24
Control channels – 2
External antenna to improve the quality of reception
Design
On the upper side of the relay, there is a pairing button, an activity indicator, a caution sign pointing out the maximum load and 8 screws for contacts.


There are 8 contacts and explanatory notes as the end of the case. From left to right – there is a
Zero line connection, closed L and IN contacts (the jumper cannot be removed), an input phase connection, two control contacts with a phase for the load and two contacts for connecting a physical switch. At the opposite end there is a wire of an external ZigBee antenna, that allows the use of an internal installation for relays. The device parameters are duplicated right there.


Mihome
For connection to the device you need to connect a zero line to the first N connector and the phase to the fourth IN connector. Next, you can use the Mihome Connection Connection Wizard. Then, you can use the Mihome connection wizard. To do this, in the gateway plugin we should go to the Device tab at the bottom, click Add Child Device and select the wireless relay in the opened list.
Next, you need to press the button on the relay for 5 seconds until the LED begins to flicker. A few seconds later, the gateway will report a successful connection to the device. After that, the first configuration step – a choice of location- will open.
The second step is the name of the device, if desired, and the third step- the final one is to indicate that the device has been added to the system. The new device will appear in the list of the gateway devices and in the Mihome general list.
The relay has its own plug-in, which is almost identical to the plug-in of two-key switch with a zero line. On the main screen, there are control buttons for each channel. There are daily, monthly and current energy meters. The consumption on both channels is cumulative.
There is one option in the device settings menu – an interlock option. Despite numerous attempts, I could not activate it – I received an error message. I assume that the button is locked on the relay. There are 6 actions available in the automation menu – each channel can be turned on, off, and switched. There are 6 actions available in the automation menu – each channel can be turned on, off, and switched. The renaming, relocation and adding a shortcut to the desktop are in the main menu.
Connection schemes
Scheme 1
We will begin testing with the first connection scheme, which is simpler, involving only the use of smart home infrastructure. Two loads and a relay are involved.
Thus, press of the button located on the device housing switches the relay. If both relays are off, they will be turned on.


If one relay is on and the other is off, they will change their status. Switching occurs with a clearly audible click. When controling from the plugin, or through MiHome automation – the relay works with a small time lag, which depends on the quality of the Internet connection The device has a separate control for each channel.
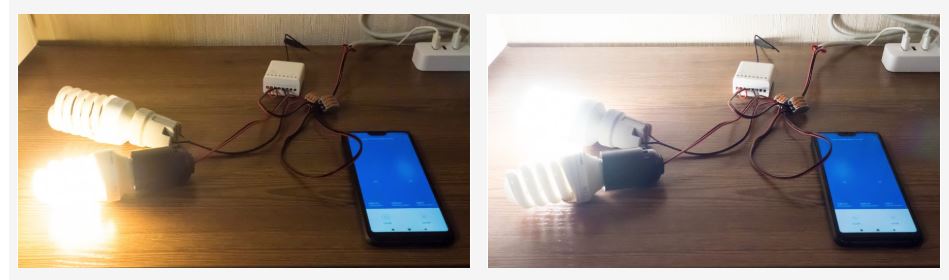
When the external power is disconnected and then restored again, the relay is turned on in the state in which it was turned off, but it almost immediately turns off the power if it was turned on.
Scheme 2
The second scheme works with a physical two-button switch. The power and load connections are the same. The input terminal of the switch is connected to the closed contacts of the relay, and two outputs are connected to S1 and S2 contacts.


In such a scheme, the physical switch controls both relay channels, and there is no dependence on either the control system or the availability of the Internet. The reaction is instant. But the plugin functionality is fully preserved. The control works, the power consumption is measured and the status is displayed. The operation scheme is completely similar to the switches, but here the first switch is physical, the second one is logical.
Conclusion
While this device is an analogue of a two-key switch with a zero line, but in a different case, in reality it is a completely different type of gadget. I’m talking about, so to speak, the soft integration of the smart home system. When using the second connection scheme, you still have the possibility of purely physical control, without dependencies on the operation of the control system. But at the same time, the relay allows you to use all the functions of logical control without exception, namely – a remote control, an energy monitoring, work in automation with any infrastructure of ecosystem.